 Relevancy and Engagement
agclassroom.org/la/
Companion Resource

Wheat Weaving: How to Make a Corn Dolly
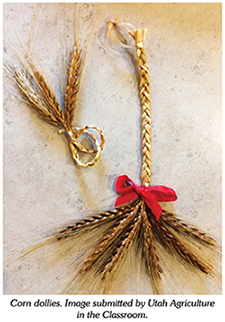
Students will learn about the history of weaving with straw and make their own woven wheat ornaments, traditionally known as "corn dollies." The art of weaving with wheat stems (straw) is practically as old as wheat itself. Traditionally, corn dollies were made using the last stems of harvested grain. Wheat was most common, but oats, rye, barley, and corn were also used. The woven ornaments with the heads of grain still on the stem were hung on inside walls where they made it safely through the winter. These sacred grains were then planted the next season to ensure the fertility of the entire crop.
Time to Complete
30 minutes
Materials
- Container and water for soaking wheat stems
- Example Corn Dollies attachment
- Wheat stems with heads, 3 or 6 per student*
- Gold ribbon or natural colored raffia, 2 pieces per student
- Optional: Red ribbon, 1 piece per student
*Wheat bundles are available for purchase.
Procedures
Preparation: Dry straw will split if you work with it. To prevent this, the straw must be soaked in water, which is called damping. Soak the wheat stems in warm water for an hour before this activity. Alternatively, you can wrap the wheat stems in a wet towel and put them in a garbage bag overnight or for at least four hours. Test the wheat to see if it is softened enough to work with by pinching the bottom end of the stems. If the stems make a cracking sound when pinched, they are still too dry.
- Explain to students that the mature stems of wheat (and other grains) are called straw. Can they think of some things straw is used for? (animal bedding, weaving straw hats and baskets)
- Share the Example Corn Dollies attachment with students and discuss the history of weaving with wheat straw and making corn dollies. Describe and demonstrate the traditional braiding technique:
- Begin by bringing the right outside straw under the middle straw.
- Then, bring the outside left straw under the middle straw.
- Repeat until the straws are completely braided.
- Hand out three or six wheat stems and two pieces of gold ribbon (or raffia) to each student. Instruct them to create their corn dollies using the following instructions:
- Cut the stems just above the first node if they are long enough to still have one. The node is the bump where the leaves attach.
- Remove any leaves from the stems.
- Use the gold ribbon to tie the stems together just below the wheat heads, leaving the ends of the ribbon long.
- Braid your stems using the traditional braid. If you have six stems, group them first into pairs. Then, braid the three pairs using the traditional braid.
- When you have braided to the end, tie the end of the stems together and trim off any excess.
- Now, you can loop the long braided stems into a design and tie them in place using the long ribbon ends left below the wheat heads. This will make a love knot, an ornament traditionally given to women in courtship. Or, you can leave your stems flat and straight and tie a red ribbon between the heads and the stems. This design is similar to the “glory” or “hair” braid that was traditionally hung in homes to sweep away evil and bring in friends.
- Discuss the way in which corn dollies were traditionally used to ensure the fertility of the next year’s wheat crop. How do farmers ensure a fertile crop today? (test the soil for nutrients and apply the needed fertilizers)
File, Map, or Graphic
Author
Utah Agriculture in the Classroom
Sources
Historical information from The Book of Wheat Weaving and Straw Craft by Morgyn Geoffry Ownens-Celli